How to backup iPhone 📱 is a crucial question for every iPhone user looking to protect their valuable data. Whether you’re concerned about losing important photos, contacts, or app information, understanding the various backup methods can provide peace of mind and ensure your data remains secure. In this comprehensive guide, we’ll explore different ways to back up your iPhone, including using iCloud, your computer, PC, or Mac, and offer solutions to common backup issues. Read on to learn how to keep your iPhone data safe and easily recoverable.
Table of Contents
Why It’s Important to Backup Your iPhone
Backing up your iPhone is crucial for several reasons, and understanding these can save you from potential headaches. With the increasing amount of personal data stored on our devices, ensuring this information is safely backed up is more important than ever. Here’s why you should regularly backup your iPhone.
1. Protect Your Data from Loss Your iPhone contains valuable data, from photos and videos to contacts and important documents. In the event of theft, loss, or damage to your iPhone, having a backup ensures that you don’t lose this irreplaceable information. Whether you choose to backup iPhone to iCloud or to your computer, having a recent backup can be a lifesaver.
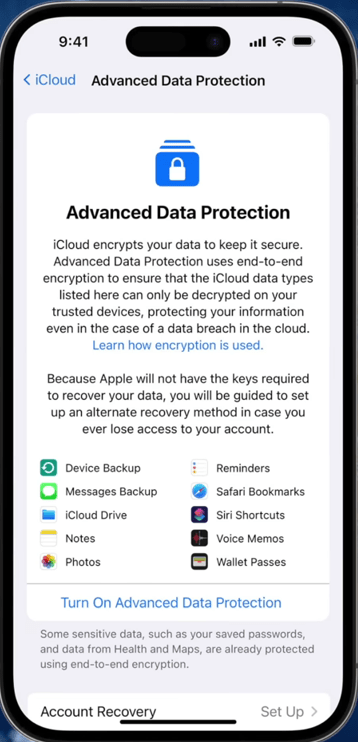
2. Easy Device Upgrades When you upgrade to a new iPhone, a backup makes the transition seamless. By restoring your data from a backup, you can have your new device up and running with all your apps, settings, and data in no time. Knowing how to backup iPhone to PC or Mac is particularly useful during these times, as you can easily restore your new device without a hitch.
3. Safeguard Against Software Issues Sometimes, software updates or app installations can cause unexpected problems. If you encounter any issues, having a backup means you can restore your iPhone to a previous state where everything was working correctly. This can save you from significant frustration and downtime.
4. Peace of Mind Regularly backing up your iPhone provides peace of mind. Knowing that your data is safe, whether you backup iPhone to iCloud automatically or manually to your computer, means you don’t have to worry about unexpected data loss. This security is invaluable, especially if your iPhone is used for work or stores critical information.
5. Simplifies Troubleshooting and Repairs If your iPhone ever needs repairs, having a backup simplifies the process. Technicians may need to reset your device to fix certain issues, and having a recent backup ensures you won’t lose any data during the repair process. This is another reason why understanding how to backup iPhone to computer or other methods is essential.
Remember, keeping your iPhone backed up is not just a technical task but a crucial step in protecting your digital life. Whether you prefer to backup iPhone to iCloud or your computer, make it a regular habit to ensure your data is always safe.
How to Backup iPhone to iCloud
Backing up your iPhone to iCloud is one of the most convenient and reliable methods to ensure your data is safe. Using iCloud allows you to store your backups in the cloud, accessible from anywhere with an internet connection. Here’s a step-by-step guide on how to backup your iPhone to iCloud.
1. Connect to Wi-Fi Before you begin, make sure your iPhone is connected to a Wi-Fi network. iCloud backups require an internet connection, and Wi-Fi is necessary to avoid using mobile data.

2. Open Settings Navigate to the Settings app on your iPhone. This is where you will find all the necessary options to configure your iCloud backup.
3. Tap on Your Name At the top of the Settings menu, tap on your name. This will take you to your Apple ID settings, where you can manage iCloud and other Apple services.
4. Select iCloud In the Apple ID menu, select the “iCloud” option. Here, you will see all the apps and services using iCloud, as well as your iCloud storage details.
5. Choose iCloud Backup Scroll down and tap on “iCloud Backup.” This section allows you to manage your backup settings and initiate a backup manually.
6. Enable iCloud Backup Toggle the “iCloud Backup” switch to turn it on. When enabled, your iPhone will automatically back up to iCloud when it is connected to Wi-Fi, plugged into a power source, and locked.
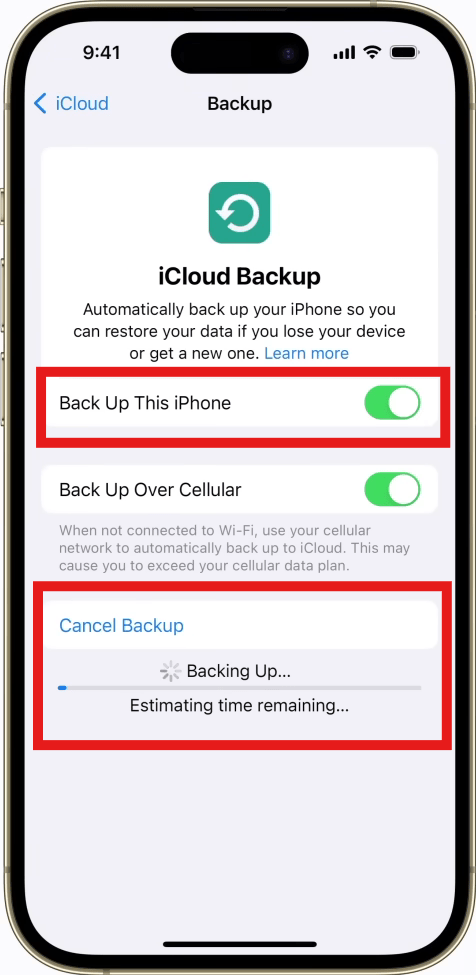
7. Start a Manual Backup To start a backup immediately, tap on “Back Up Now.” This will begin the process of uploading your data to iCloud. Ensure your iPhone stays connected to Wi-Fi until the backup is complete.
8. Verify Your Backup Once the backup is complete, you can verify it by going back to the “iCloud Backup” section. The date and time of the last backup will be displayed, confirming that your data is safely stored in iCloud.
Troubleshooting Common Issues
- Insufficient iCloud Storage: If you run out of iCloud storage, you can manage your storage settings to delete old backups or purchase additional storage.
- Backup Fails to Complete: Ensure your iPhone remains connected to Wi-Fi and power during the backup process. Restarting your device can also resolve some issues.
By following these steps, you can easily backup your iPhone to iCloud, ensuring your data is protected and readily available when needed.
How to Backup iPhone to Computer
Backing up your iPhone to a computer is a reliable way to ensure your data is safe and easily accessible. Whether you use a Windows PC or a Mac, the process is straightforward. Here’s how to backup your iPhone to a computer.
1. Connect Your iPhone to Your Computer Start by connecting your iPhone to your computer using a USB cable. Ensure your computer recognizes the device.
2. Open iTunes or Finder
- For Windows and macOS Mojave or earlier: Open iTunes. If you don’t have iTunes installed, you can download it from the Apple website.
- For macOS Catalina or later: Open Finder. Apple replaced iTunes with Finder for managing iOS devices in these versions of macOS.
3. Locate Your Device
- In iTunes: Look for the iPhone icon in the upper left corner and click on it.
- In Finder: Your iPhone should appear in the sidebar under “Locations.” Click on it.
4. Trust This Computer If prompted, tap “Trust” on your iPhone and enter your passcode. This step ensures your iPhone can communicate with your computer.
5. Select Backup Options In the device summary page, you’ll see the option to back up your data. Select “This Computer” to store the backup on your computer. For added security, you can choose to “Encrypt iPhone Backup,” which requires you to set a password.
6. Start the Backup Process Click on “Back Up Now” to begin the backup process. This will copy all your iPhone data, including apps, settings, and files, to your computer.
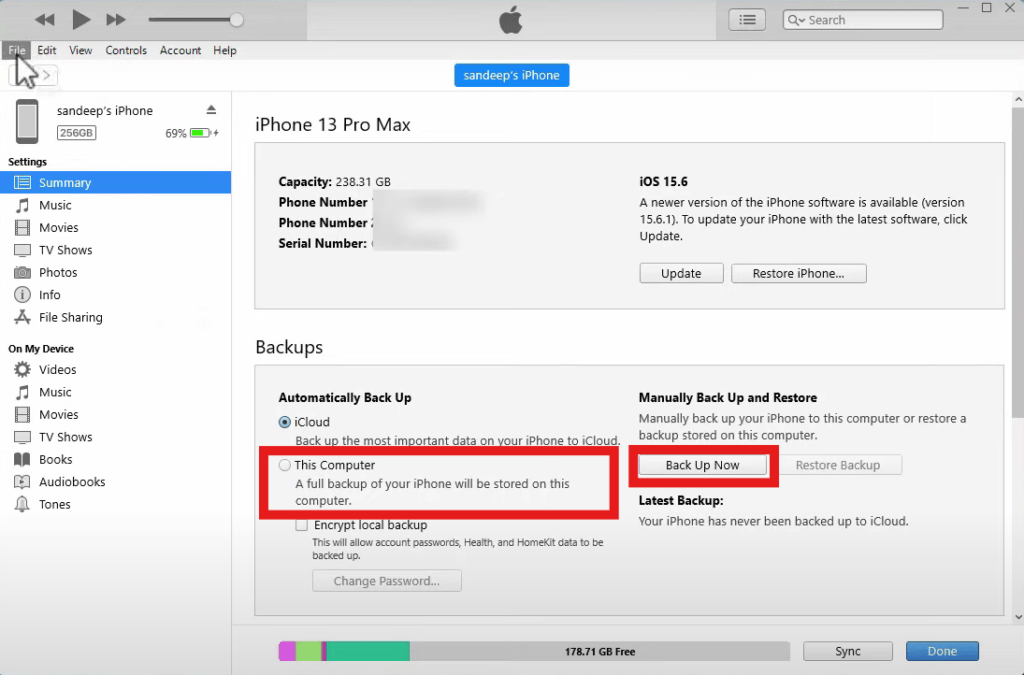
7. Monitor the Backup Progress You can monitor the progress at the top of the iTunes or Finder window. Ensure your iPhone stays connected to the computer until the backup is complete.
8. Verify Your Backup Once the backup is complete, you can verify it by going to the backup section in iTunes or Finder. The date and time of the last backup will be displayed.
Benefits of Backing Up to a Computer
- Local Storage: Backing up to a computer ensures your data is stored locally, which can be quicker and doesn’t depend on internet speeds.
- Comprehensive Backup: A computer backup includes more data compared to an iCloud backup, such as app data and settings.
- Easy Restoration: Restoring your iPhone from a computer backup is simple, especially if you encounter software issues or are setting up a new device.
Tips for Successful Backups
- Regular Backups: Make a habit of backing up your iPhone regularly to ensure your data is always up-to-date.
- Manage Storage: Ensure your computer has enough storage space to accommodate the backup file.
- Keep Software Updated: Ensure both your computer’s operating system and iTunes/Finder are up-to-date for compatibility and improved performance.
By following these steps, you can easily backup your iPhone to a computer, providing a reliable way to safeguard your important data.
How to Backup iPhone to PC
Backing up your iPhone to a PC is a reliable method to ensure your data is secure and easily accessible. This process involves using iTunes, a free software provided by Apple. Here’s a step-by-step guide on how to backup your iPhone to a PC.
1. Download and Install iTunes If you haven’t already installed iTunes on your PC, download it from the Apple website and follow the installation instructions. Ensure you have the latest version of iTunes to avoid compatibility issues.
2. Connect Your iPhone to Your PC Use a USB cable to connect your iPhone to your PC. Ensure your PC recognizes the device. If prompted, tap “Trust” on your iPhone and enter your passcode to establish a secure connection.
3. Open iTunes Launch iTunes on your PC. You should see an iPhone icon appear in the upper left corner of the iTunes window.
4. Locate Your Device in iTunes Click on the iPhone icon to access the device summary page. This page displays information about your iPhone and backup options.
5. Select Backup Settings In the device summary page, find the “Backups” section. Select “This Computer” to store the backup on your PC. For added security, you can choose to “Encrypt iPhone Backup” and set a password. Encryption protects sensitive information, such as Health and Activity data.
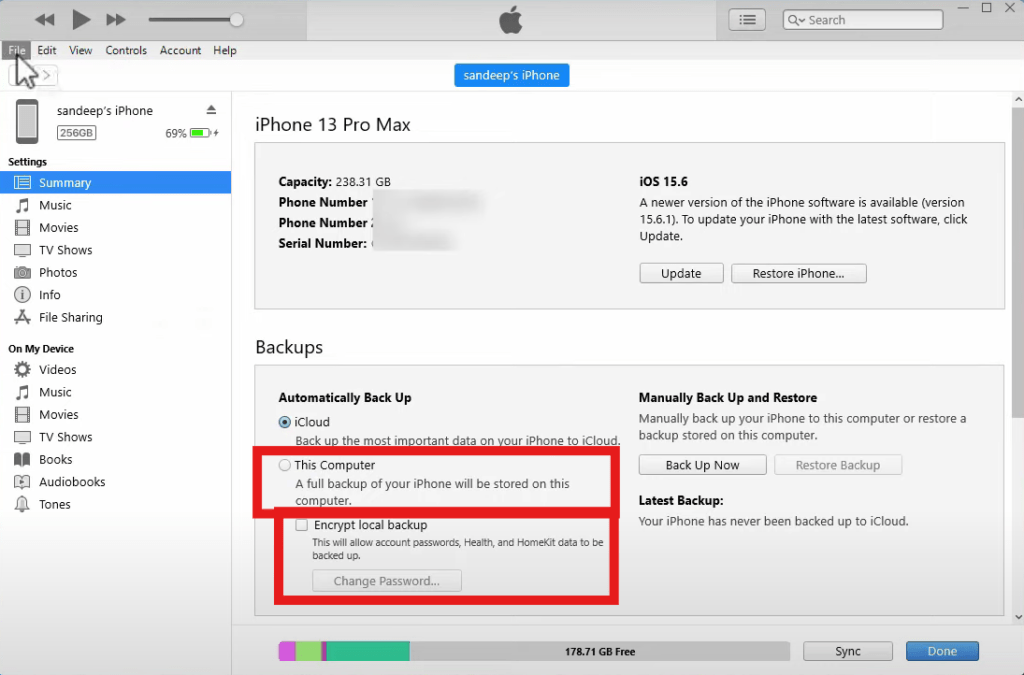
6. Start the Backup Process Click on “Back Up Now” to initiate the backup. This process will save your iPhone data, including apps, settings, and files, to your PC.
7. Monitor the Backup Progress You can track the progress at the top of the iTunes window. Ensure your iPhone remains connected to your PC until the backup is complete.
8. Verify Your Backup After the backup is complete, you can verify it by going to the backup section in iTunes. The date and time of the last backup will be displayed, confirming the process was successful.
Benefits of Backing Up to a PC
- Local Storage: Backing up your iPhone to a PC means your data is stored locally, which can be faster and does not depend on internet speed.
- Comprehensive Data Backup: A PC backup includes more data than an iCloud backup, such as app data and settings.
- Easy Restoration: Restoring your iPhone from a PC backup is straightforward and can be done whenever needed, especially if you experience software issues or are setting up a new device.
Troubleshooting Common Issues
- Device Not Recognized: Ensure your iPhone is properly connected and unlocked. Restarting both your iPhone and PC can sometimes resolve recognition issues.
- Insufficient Disk Space: Check that your PC has enough storage space to accommodate the backup file. Free up space if necessary.
- Software Updates: Make sure both iTunes and your PC’s operating system are up-to-date to avoid compatibility problems.
By following these steps, you can easily backup your iPhone to a PC, ensuring your important data is protected and readily available.
How to Backup iPhone to Mac
Backing up your iPhone to a Mac is a straightforward process that helps keep your data secure and easily accessible. Depending on your macOS version, you’ll use Finder or iTunes to perform the backup. Here’s a step-by-step guide on how to backup your iPhone to a Mac.
1. Connect Your iPhone to Your Mac Use a USB cable to connect your iPhone to your Mac. Ensure your Mac recognizes the device. If prompted, tap “Trust” on your iPhone and enter your passcode to establish a secure connection.
2. Open Finder or iTunes
- For macOS Catalina or later: Open Finder. Apple replaced iTunes with Finder for managing iOS devices in these versions of macOS.
- For macOS Mojave or earlier: Open iTunes. If you don’t have iTunes installed, you can download it from the Apple website.
3. Locate Your Device
- In Finder: Your iPhone should appear in the sidebar under “Locations.” Click on it to open the device summary page.
- In iTunes: Look for the iPhone icon in the upper left corner and click on it to access the device summary page.
4. Select Backup Options In the device summary page, you’ll see the backup options. Select “Back up all of the data on your iPhone to this Mac” to store the backup locally. For added security, you can choose to “Encrypt local backup” and set a password. Encryption protects sensitive information, such as Health and Activity data.
5. Start the Backup Process Click on “Back Up Now” to initiate the backup process. This will save all your iPhone data, including apps, settings, and files, to your Mac.
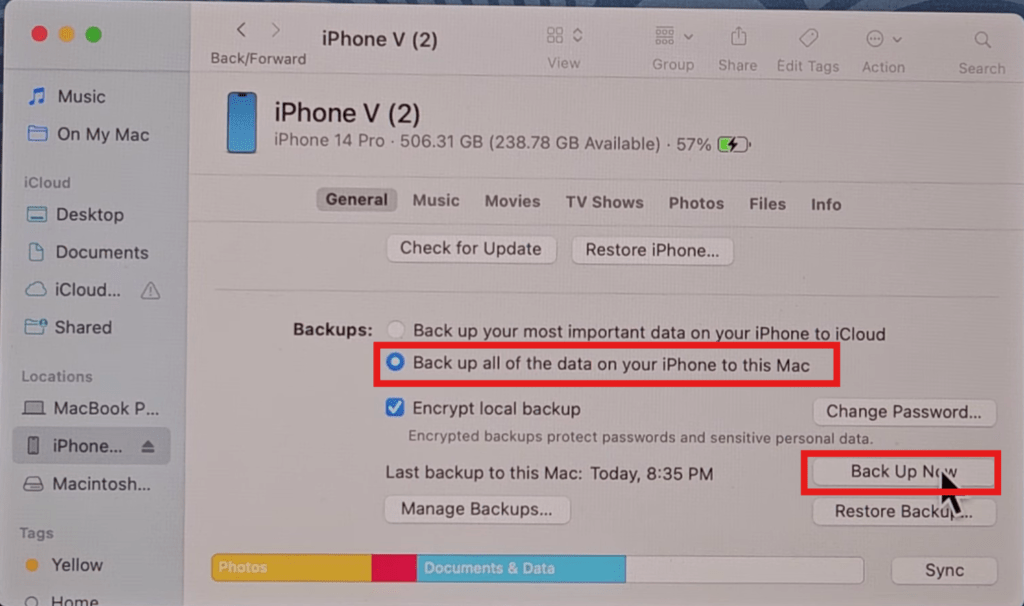
6. Monitor the Backup Progress You can monitor the progress at the top of the Finder or iTunes window. Ensure your iPhone remains connected to your Mac until the backup is complete.
7. Verify Your Backup After the backup is complete, you can verify it by checking the “Latest Backup” section in Finder or iTunes. The date and time of the last backup will be displayed, confirming that your data is safely stored on your Mac.
Benefits of Backing Up to a Mac
- Local Storage: Backing up your iPhone to a Mac ensures your data is stored locally, which can be quicker and doesn’t depend on internet speeds.
- Comprehensive Backup: A Mac backup includes more data than an iCloud backup, such as app data and settings.
- Easy Restoration: Restoring your iPhone from a Mac backup is straightforward, whether you are setting up a new device or recovering from software issues.
- Regular Backups: Make a habit of backing up your iPhone regularly to ensure your data is always up-to-date.
- Manage Storage: Ensure your Mac has enough storage space to accommodate the backup file.
- Keep Software Updated: Ensure both your Mac’s operating system and Finder/iTunes are up-to-date for compatibility and improved performance.
Troubleshooting Common Issues
- Device Not Recognized: Ensure your iPhone is properly connected and unlocked. Restarting both your iPhone and Mac can sometimes resolve recognition issues.
- Insufficient Disk Space: Check that your Mac has enough storage space to accommodate the backup file. Free up space if necessary.
- Software Updates: Make sure both your Mac’s operating system and Finder/iTunes are up-to-date to avoid compatibility problems.
By following these steps, you can easily backup your iPhone to a Mac, ensuring your important data is protected and readily available.
How Do I Backup an iPhone?
Backing up your iPhone is essential to ensure your data is safe and can be restored if anything happens to your device. There are several ways to backup an iPhone, including using iCloud, a computer, a PC, or a Mac. Here’s a comprehensive guide on how to backup an iPhone using various methods.
1. Backup iPhone to iCloud Backing up to iCloud is convenient because it allows you to store your data in the cloud and access it from anywhere.
- Connect to Wi-Fi: Ensure your iPhone is connected to a Wi-Fi network.
- Open Settings: Navigate to the Settings app on your iPhone.
- Tap on Your Name: Select your name at the top of the Settings menu to access Apple ID settings.
- Select iCloud: In the Apple ID menu, choose “iCloud.”
- Choose iCloud Backup: Scroll down and tap “iCloud Backup.”
- Enable iCloud Backup: Toggle the “iCloud Backup” switch to turn it on.
- Start a Manual Backup: Tap “Back Up Now” to initiate the backup process.
2. Backup iPhone to Computer Backing up to a computer is a reliable method, providing a local copy of your data.
- Connect Your iPhone: Use a USB cable to connect your iPhone to your computer.
- Open iTunes or Finder:
- Windows and macOS Mojave or earlier: Open iTunes.
- macOS Catalina or later: Open Finder.
- Locate Your Device:
- In iTunes: Click the iPhone icon.
- In Finder: Find your iPhone under “Locations” in the sidebar.
- Select Backup Options: Choose “Back up all of the data on your iPhone to this computer.”
- Encrypt Backup (Optional): For added security, select “Encrypt iPhone Backup” and set a password.
- Start the Backup: Click “Back Up Now.”
3. Backup iPhone to PC Using iTunes on a PC provides a straightforward way to backup your iPhone.
- Download and Install iTunes: If not already installed, download iTunes from the Apple website.
- Connect Your iPhone: Use a USB cable to connect your iPhone to the PC.
- Open iTunes: Launch iTunes.
- Locate Your Device: Click the iPhone icon in the upper left corner.
- Select Backup Options: Choose “This Computer” for the backup location.
- Encrypt Backup (Optional): Select “Encrypt iPhone Backup” for added security.
- Start the Backup: Click “Back Up Now.”
4. Backup iPhone to Mac For Mac users, backing up to a Mac is simple and efficient.
- Connect Your iPhone: Use a USB cable to connect your iPhone to your Mac.
- Open Finder or iTunes:
- macOS Catalina or later: Open Finder.
- macOS Mojave or earlier: Open iTunes.
- Locate Your Device:
- In Finder: Find your iPhone under “Locations” in the sidebar.
- In iTunes: Click the iPhone icon.
- Select Backup Options: Choose “Back up all of the data on your iPhone to this Mac.”
- Encrypt Backup (Optional): Select “Encrypt local backup” and set a password.
- Start the Backup: Click “Back Up Now.”
Why It’s Important to Backup Your iPhone Backing up your iPhone ensures your data is protected in case of loss, theft, or damage. It also simplifies the process of setting up a new device or restoring your current one if you encounter software issues. Regular backups provide peace of mind, knowing that your important information is safe.
Troubleshooting Backup Issues
- Device Not Recognized: Ensure your iPhone is properly connected and unlocked. Restarting both your device and computer can help.
- Insufficient Storage: Ensure there is enough storage space on iCloud or your computer. Free up space if necessary.
- Software Updates: Keep your iPhone, computer, and software (iTunes or Finder) updated to avoid compatibility issues.
By following these steps, you can efficiently backup your iPhone using various methods, ensuring your data is protected and readily available when needed.
Automatic Backup Settings for iPhone
Setting up automatic backup settings for your iPhone ensures that your data is regularly saved without the need for manual intervention. This feature, available through iCloud, provides peace of mind by keeping your data up-to-date. Here’s how to configure automatic backup settings for your iPhone.
1. Connect to Wi-Fi Ensure your iPhone is connected to a Wi-Fi network. Automatic backups require a Wi-Fi connection to avoid using mobile data.
2. Open Settings Navigate to the Settings app on your iPhone.
3. Tap on Your Name At the top of the Settings menu, tap on your name to access Apple ID settings.
4. Select iCloud In the Apple ID menu, tap on “iCloud.” Here you can manage all iCloud-related settings.
5. Choose iCloud Backup Scroll down and select “iCloud Backup.” This is where you can configure your backup settings.
6. Enable iCloud Backup Toggle the “iCloud Backup” switch to turn it on. When enabled, your iPhone will automatically back up your data every day when it is connected to a power source, connected to Wi-Fi, and locked.
7. Verify Automatic Backup Settings To ensure everything is set up correctly, tap “Back Up Now” to perform a manual backup. This will also confirm that your iPhone can successfully connect to iCloud for backups.
Benefits of Automatic Backups
- Convenience: Automatic backups run in the background, ensuring your data is always up-to-date without manual effort.
- Security: Your data is safely stored in iCloud, protected by your Apple ID and password.
- Consistency: Daily backups ensure that any new data, such as photos, contacts, and app data, is regularly saved.
Managing iCloud Storage Automatic backups use your iCloud storage, so it’s essential to manage your storage space effectively.
- Check Storage Usage: In the iCloud settings, tap “Manage Storage” to see how much space your backups are using.
- Free Up Space: If you’re running low on iCloud storage, you can delete old backups or purchase additional storage from Apple.
- Optimize Backup Content: Select which apps to back up by tapping “Show All Apps” under the iCloud Backup settings and toggling off any apps you don’t need to include in the backup.
Troubleshooting Automatic Backups
- Backup Fails to Complete: Ensure your iPhone is connected to Wi-Fi, plugged into a power source, and locked. Restarting your device can also help resolve issues.
- Insufficient iCloud Storage: Free up space or upgrade your iCloud storage plan to accommodate your backups.
- Software Updates: Keep your iPhone’s software up-to-date to ensure compatibility with iCloud Backup.
By configuring automatic backup settings for your iPhone, you ensure that your important data is consistently and securely backed up, providing peace of mind and ease of data recovery.
Restoring Your iPhone from a Backup
Restoring your iPhone from a backup is a crucial step when you want to recover lost data, set up a new device, or fix software issues. Whether you have an iCloud backup or a backup stored on your computer, the process is straightforward. Here’s how to restore your iPhone from a backup.
1. Restore from an iCloud Backup
Restoring from an iCloud backup is convenient as it allows you to retrieve your data wirelessly.
Step-by-Step Guide:
- Erase Your iPhone: Go to Settings > General > Reset > Erase All Content and Settings. This step is necessary to start the restoration process.
- Set Up Your iPhone: After erasing, your iPhone will restart and display the setup screen. Follow the on-screen instructions until you reach the Apps & Data screen.
- Select Restore from iCloud Backup: On the Apps & Data screen, choose “Restore from iCloud Backup.”
- Sign In to iCloud: Enter your Apple ID and password to sign in to iCloud.
- Choose a Backup: Select the backup you want to restore from the list of available backups. Ensure it’s the most recent one to recover the latest data.
- Complete the Setup: Follow the on-screen instructions to complete the setup. Your iPhone will restore the data from the chosen backup.
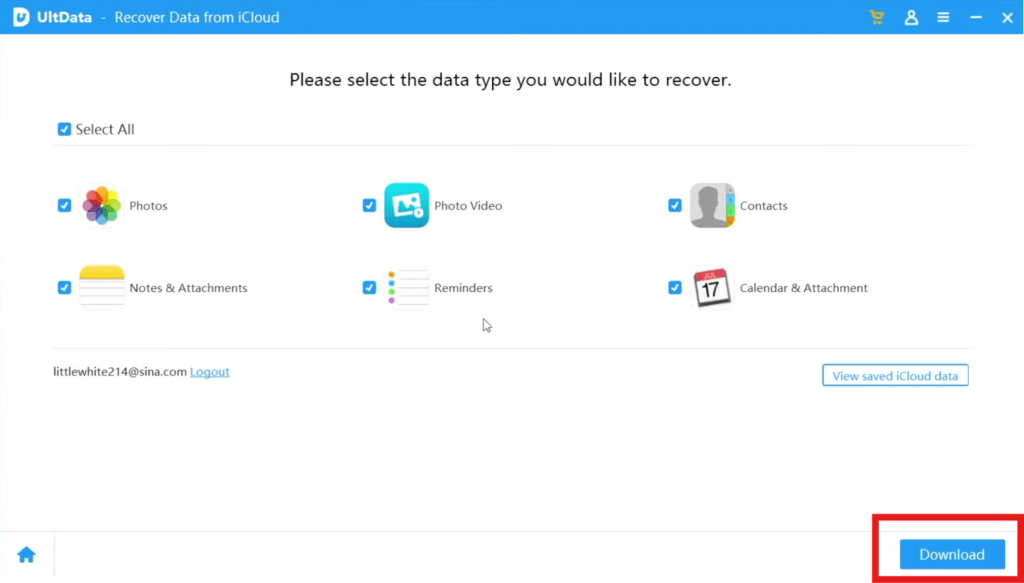
2. Restore from a Computer Backup
If you have backed up your iPhone to a computer using iTunes or Finder, you can restore your data using these applications.
Step-by-Step Guide:
- Connect Your iPhone to Your Computer: Use a USB cable to connect your iPhone to the computer where the backup is stored.
- Open iTunes or Finder:
- Windows and macOS Mojave or earlier: Open iTunes.
- macOS Catalina or later: Open Finder.
- Locate Your Device:
- In iTunes: Click the iPhone icon in the upper left corner.
- In Finder: Find your iPhone under “Locations” in the sidebar.
- Select Restore Backup: On the device summary page, click “Restore Backup.”
- Choose a Backup: Select the desired backup from the list. Ensure it’s the most recent one.
- Enter Password (if encrypted): If you encrypted your backup, you’ll need to enter the password to proceed.
- Start the Restore: Click “Restore” and wait for the process to complete. Keep your iPhone connected until the restore is finished.
Benefits of Restoring from a Backup
- Data Recovery: Restoring from a backup allows you to recover lost data, such as contacts, messages, photos, and app data.
- Easy Setup: It simplifies the process of setting up a new device, as all your settings, apps, and data are restored.
- Fix Software Issues: If your iPhone is experiencing software problems, restoring from a backup can resolve these issues and return your device to a stable state.
Troubleshooting Common Issues
- Backup Not Found: Ensure you’re signed in with the correct Apple ID and have an available backup. Check your iCloud storage or computer for the backup file.
- Restore Process Fails: Restart your iPhone and computer, and try the restore process again. Ensure both devices are updated to the latest software version.
- Insufficient Storage: Ensure your iPhone has enough storage space to accommodate the backup data. Free up space if necessary.
By following these steps, you can efficiently restore your iPhone from a backup, ensuring your important data is recovered and your device is up and running smoothly.
Troubleshooting Backup Issues
Encountering issues while backing up your iPhone can be frustrating, but most problems can be resolved with a few troubleshooting steps. Here’s how to address common backup issues and ensure your iPhone’s data is securely saved.
1. Backup Fails to Complete
Possible Solutions:
- Check Internet Connection: Ensure your iPhone is connected to a stable Wi-Fi network for iCloud backups. For computer backups, make sure your computer is connected to the internet if needed.
- Verify Power Source: Your iPhone must be connected to a power source during an iCloud backup. Connect it to a charger if necessary.
- Restart Devices: Restart both your iPhone and the computer to resolve temporary issues that might be affecting the backup process.
- Check iCloud Status: Visit Apple’s System Status page to ensure iCloud services are not experiencing outages.
2. Device Not Recognized
Possible Solutions:
- Check Cable Connection: Ensure the USB cable is securely connected to both your iPhone and computer. Try using a different cable or USB port if the issue persists.
- Unlock Your iPhone: Make sure your iPhone is unlocked and on the home screen when connecting to the computer.
- Trust This Computer: When prompted on your iPhone, select “Trust” and enter your passcode to establish a secure connection with the computer.
3. Insufficient Storage Space
Possible Solutions:
- Free Up iCloud Storage: In iCloud settings, tap “Manage Storage” to view and delete old backups or apps you no longer need. You may also consider upgrading your iCloud storage plan.
- Free Up Computer Storage: Ensure your computer has enough available space to accommodate the backup file. Delete unnecessary files or applications to create space.
- Optimize Backup Content: In iCloud settings, choose which apps to back up by turning off unnecessary ones, reducing the amount of data being backed up.
4. Backup Not Available or Not Showing
Possible Solutions:
- Sign In with Correct Apple ID: Make sure you’re signed in with the Apple ID used for the backup. Go to Settings > [Your Name] > iCloud to verify your Apple ID.
- Check Backup List: In iCloud settings, ensure the backup you want to restore from is listed and has been completed successfully.
- Update Software: Ensure your iPhone’s iOS and the computer’s software (iTunes or Finder) are up-to-date. Outdated software can cause compatibility issues.
5. Encrypted Backup Issues
Possible Solutions:
- Enter Correct Password: If you encrypted your backup, you’ll need to enter the correct password to restore it. Ensure you remember the password or use a password manager to retrieve it.
- Create a New Backup: If you cannot remember the password, you may need to create a new backup without encryption.
6. Backup Process is Slow
Possible Solutions:
- Check Network Speed: For iCloud backups, ensure your Wi-Fi network is stable and has a good connection speed.
- Avoid Peak Times: Perform backups during off-peak hours to avoid network congestion.
- Reduce Backup Size: Delete large files or apps that are not necessary to reduce the backup size.
By following these troubleshooting steps, you can resolve common backup issues and ensure your iPhone data is securely backed up, giving you peace of mind and a reliable data recovery option.
Frequently Asked Questions About iPhone Backups
1. How do I backup my iPhone? To backup your iPhone, you can use iCloud or a computer.
- iCloud Backup: Go to Settings > [Your Name] > iCloud > iCloud Backup and toggle on the backup option. Tap “Back Up Now” to perform a manual backup.
- Computer Backup: Connect your iPhone to a computer using a USB cable. Open iTunes (Windows/macOS Mojave or earlier) or Finder (macOS Catalina or later), select your device, and choose “Back Up Now.”
2. How to backup iPhone to iCloud? To backup your iPhone to iCloud:
- Ensure your iPhone is connected to Wi-Fi.
- Go to Settings > [Your Name] > iCloud > iCloud Backup.
- Toggle on “iCloud Backup” and tap “Back Up Now” to start a manual backup.
3. How to backup iPhone to a computer? To backup your iPhone to a computer:
- Connect your iPhone to the computer using a USB cable.
- Open iTunes or Finder, locate your device, and choose “Back Up Now” under the backup options.
4. How to backup iPhone to a PC? To backup your iPhone to a PC:
- Install iTunes on your PC if it’s not already installed.
- Connect your iPhone to the PC using a USB cable.
- Open iTunes, click the iPhone icon, and select “This Computer” under backup options. Click “Back Up Now” to start the backup.
5. How to backup iPhone to a Mac? To backup your iPhone to a Mac:
- Connect your iPhone to your Mac using a USB cable.
- Open Finder (macOS Catalina or later) or iTunes (macOS Mojave or earlier).
- Locate your device and choose “Back Up Now” under the backup options.
6. How do I backup an iPhone if I don’t have enough iCloud storage? If you don’t have enough iCloud storage, you can:
- Upgrade Your iCloud Storage Plan: Go to Settings > [Your Name] > iCloud > Manage Storage > Change Storage Plan.
- Free Up Space: Delete old backups or apps you no longer need.
- Backup to a Computer: Use iTunes or Finder to back up your iPhone to a computer instead of iCloud.
7. Can I backup my iPhone without Wi-Fi? You need a Wi-Fi connection to perform an iCloud backup. However, you can backup your iPhone to a computer using iTunes or Finder without needing Wi-Fi.
8. How do I restore my iPhone from a backup? To restore your iPhone from a backup:
- iCloud Backup: Go to Settings > General > Reset > Erase All Content and Settings. After erasing, follow the setup prompts and choose “Restore from iCloud Backup.”
- Computer Backup: Connect your iPhone to the computer, open iTunes or Finder, locate your device, and select “Restore Backup.”
9. What should I do if my iPhone backup fails? If your iPhone backup fails:
- Check Your Connection: Ensure your iPhone is connected to Wi-Fi (for iCloud) or properly connected to your computer (for iTunes/Finder).
- Verify Storage: Make sure you have enough iCloud or computer storage space.
- Restart Devices: Restart both your iPhone and computer.
- Update Software: Ensure your iPhone and software (iTunes/Finder) are up-to-date.
10. How often should I backup my iPhone? It’s a good practice to back up your iPhone regularly. iCloud backups are performed automatically when your iPhone is connected to Wi-Fi, plugged in, and locked. For manual backups to a computer, aim to back up at least once a month or before making significant changes to your device.
These FAQs address common concerns and guide you through the process of backing up and restoring your iPhone, ensuring your data remains safe and accessible.
Conclusion
Backing up your iPhone is essential for safeguarding your valuable data, whether it’s cherished photos, important contacts, or crucial app information. With several methods available, including iCloud, computer backups, and even direct backups to a PC or Mac, you can choose the approach that best fits your needs and preferences.
By setting up automatic backups and understanding how to restore your iPhone from a backup, you ensure that your data is consistently protected and readily recoverable in case of loss, damage, or when setting up a new device. Troubleshooting common backup issues and addressing frequently asked questions can further help in maintaining smooth and hassle-free backup processes.
Remember, regular backups provide peace of mind and a safety net for your digital life. Make it a habit to check your backup settings and ensure that your iPhone’s data is always secure.
Summary Table
| Serial Number | Point Name | Description |
|---|---|---|
| 1 | Why It’s Important to Backup Your iPhone | Discusses the significance of backing up your iPhone, including data protection and ease of recovery. |
| 2 | How to Backup iPhone to iCloud | Step-by-step guide to backing up your iPhone to iCloud, including enabling backup and verifying settings. |
| 3 | How to Backup iPhone to Computer | Instructions for backing up your iPhone to a computer using iTunes or Finder. |
| 4 | How to Backup iPhone to PC | Guide on backing up your iPhone to a PC using iTunes, including setup and backup options. |
| 5 | How to Backup iPhone to Mac | Details on backing up your iPhone to a Mac using Finder or iTunes, including backup settings. |
| 6 | How Do I Backup an iPhone? | Overview of various methods for backing up an iPhone, including iCloud and computer options. |
| 7 | Automatic Backup Settings for iPhone | Instructions for setting up automatic backups using iCloud, including enabling backup and managing storage. |
| 8 | Restoring Your iPhone from a Backup | Steps to restore your iPhone from a backup, including iCloud and computer backup restoration processes. |
| 9 | Troubleshooting Backup Issues | Solutions to common backup issues, such as backup failures, device recognition problems, and storage issues. |
| 10 | Frequently Asked Questions About iPhone Backups | Answers to common questions about iPhone backups, including methods, storage concerns, and restoration. |
This summary table provides a quick reference to the key topics covered in the blog post, helping readers easily find the information they need.




Pingback: iPhone 15 Pro: An In-Depth Review of Its Design, Performance, and More - Digital Digest